


However, following the global trend of automating recurrent actions, the progressive part of the developer community exercises the continuous integration (CI) method. The iOS department of the Live Typing company has decided to get in on the act and deploy a server for Jenkins
As a result, the server:
- Starts building:
- After a web hook in case of push to master branch;
- After a command in Slack chat with the branch and additional parameters specified.
- After a command in Slack chat with the branch and additional parameters specified.
- Obtains the following metrics:
- Code test coverage;
- Code line count;
- Code duplication;
- Code cyclomatic complexity.
- Archives the project to.ipa, forwards it to the (
custom-developed ) build server and sends a link to the build to Slack.
This way, we conserve a great deal of time and effort, forgetting what it’s like to manually create and send a build. While our guide is intended to share this feeling and experience, we realize that, as any other guide, it does not claim to be the ultimate truth.
Therefore, be sure to examine the following items to determine whether our guide is compatible with your particular goals:
- In our case, the server was deployed to use with iOS development;
- Most utility programs were installed using Homebrew, including Jenkins itself (due to quick updates and convenience of use);
- xcodebuilder was used for all tasks of building and testing (we gave up on xctool because it made launching UI tests impossible);
- We used GitLab as the repository;
- We used our
custom-made server to store builds. A unique URL is generated for each build, and it’s enough to open the link in a browser from a mobile device and click «Install». Thanks to the Enterprise account, everyone can install the app on their phone. Due to the distinctive nature of how we send files to our server, this stage is omitted in the article; - All of our projects use the CocoaPods dependency manager.
As the guide turned out to be somewhat bulky, we had to split it in two parts. The first part deals with the basic installation and configuration of Jenkins.
You will require:
- Mac with OS X and Xcode installed (In our case it was a MacBook Pro 2011 with OS X 10.11.4);
- A few hours of free time.
Creating and setting up the Jenkins user.
The user can be created using either the console or the GUI. The latter option is unlikely to cause any trouble, so we will examine the former (source):
#Creating the 'Applications' group
dseditgroup -o create -n . -u username -p -r 'Applications' applications
#Getting a group identifier
sudo dscl . -read /Groups/applications
#Getting the identifier list for users (you will require a unique identifier for the user)
sudo dscl . -list /Users UniqueID
#Creating the user (identifier values have to be unique)
sudo dscl . -create /Users/jenkins
sudo dscl . -create /Users/jenkins PrimaryGroupID 777
sudo dscl . -create /Users/jenkins UniqueID 1777
sudo dscl . -create /Users/jenkins UserShell /bin/bash
sudo ddcl . -create /Users/jenkins RealName "Jenkins"
sudo dscl . -create /Users/jenkins NFSHomeDirectory /Users/jenkins
sudo dscl . -passwd /Users/jenkins
#Creating a home directory and setting permissions for it
sudo mkdir /Users/jenkins
sudo chown -R jenkins /Users/Jenkins
The user is now ready and we can log in. We can do it either via GUI or using the console:
sudo -u jenkins -i
Notice: all subsequent activities are done under the Jenkins user.
Installing the required programs
To install Jenkins we’ll use the Homebrew package manager. This will make installation easier, as well as simplify the process of updating optional packages we will use to obtain code metrics in the future.
1. Installing Homebrew:
/usr/bin/ruby -e "$(curl -fsSL https://raw.githubusercontent.com/Homebrew/install/master/install)"
2. Installing Jenkins:
brew install jenkins
3. Installing the Cocoapods dependency manager:
sudo gem install -n /usr/local/bin cocoapods
To let our server launch automatically on system
| Daemon | Agent | |
|---|---|---|
| Launch Time | System start | User login |
| User Type | Login | |
| Home Folder | No | Yes |
| Login Keychain | No | Yes |
| iOS Simulator | No | Yes |
| Provisioning Profiles | No | Yes |
*The main problem with launching using Daemon is that you can’t start testing without launching the iOS Simulator (you can learn more about the difference between using the daemon and the agent here)
But because we opted for LaunchAgents, we have to deal with the following problem: the lack of a
To set up launch under LaunchAgents we have to do the following steps:
1. Unload the daemon (it was created automatically during Jenkins installation):
sudo launchctl unload /Library/LaunchDaemons/homebrew.mxcl.jenkins.plist
2. Remove the daemon:
sudo rm /Library/LaunchDaemons/homebrew.mxcl.jenkins.plist
3. Create the agent:
cd /Users/jenkins/Library/LaunchAgents
tap homebrew.mxcl.jenkins.plist
4. Configure the agent using the Vim editor:
vim homebrew.mxcl.jenkins.plist
Here’s an example of the plist file contents:
<?xml version="1.0" encoding="UTF-8"?>
<!DOCTYPE plist PUBLIC "-//Apple//DTD PLIST 1.0//EN" "http://www.apple.com/DTDs/PropertyList-1.0.dtd">
<plist version="1.0">
  <dict>
    <key>Label</key>
    <string>homebrew.mxcl.jenkins</string>
    <key>ProgramArguments</key>
    <array>
      <string>/usr/bin/java</string>
      <string>-Dmail.smtp.starttls.enable=true</string>
      <string>-jar</string>
      <string>/usr/local/opt/jenkins/libexec/jenkins.war</string>
      <string>—httpListenAddress=<nobr>0.0.0.0</nobr></string>
      <string>--httpPort=8080</string>
    </array>
    <key>RunAtLoad</key>
    <true/>
    <key>UserName</key>
    <string>jenkins</string>
  </dict>
</plist>
It’s worth paying attention to the «httpListenAddress» field with the value of
A reminder: to close and save the file in the Vim editor, type:wq.
After installation, Jenkins is accessible at the
To gain access from an external network you can forward ports on your router: 8080 for the Jenkins web interface and 22 for ssh access.
Installing plugins for Jenkins
Log into the Jenkins server -> Manage Jenkins -> Manage plugins. Look for the following plugins in the «Available» tab and install them:
Role-based Authorization Strategy — provides security. Allows creating user groups and managing permissions.- GitLab Plugin and Gitlab Hook Plugin- plugins for working with Gitlab;
- Xcode integration;
- Keychains and Provisioning Profiles Management — makes managing the provisioning profile easier.
Basic Jenkins configuration
Open up the settings menu in the Jenkins web interface and go to the «System configuration» section. Things that need your attention here are:
1. Xcode Builder settings. If you have installed Xcode to a standard directory, you don’t need to change any settings. Otherwise, you have to specify the path to the required components. As we have launched the server using LaunchAgents, Xcode will have access to login.keychain. But if you want to be sure, you can add the keychain as shown in the screenshot below:
*Now we can load the required certificates using GUI or shell into login.keychain, while Xcode will pull its requirements during the build.
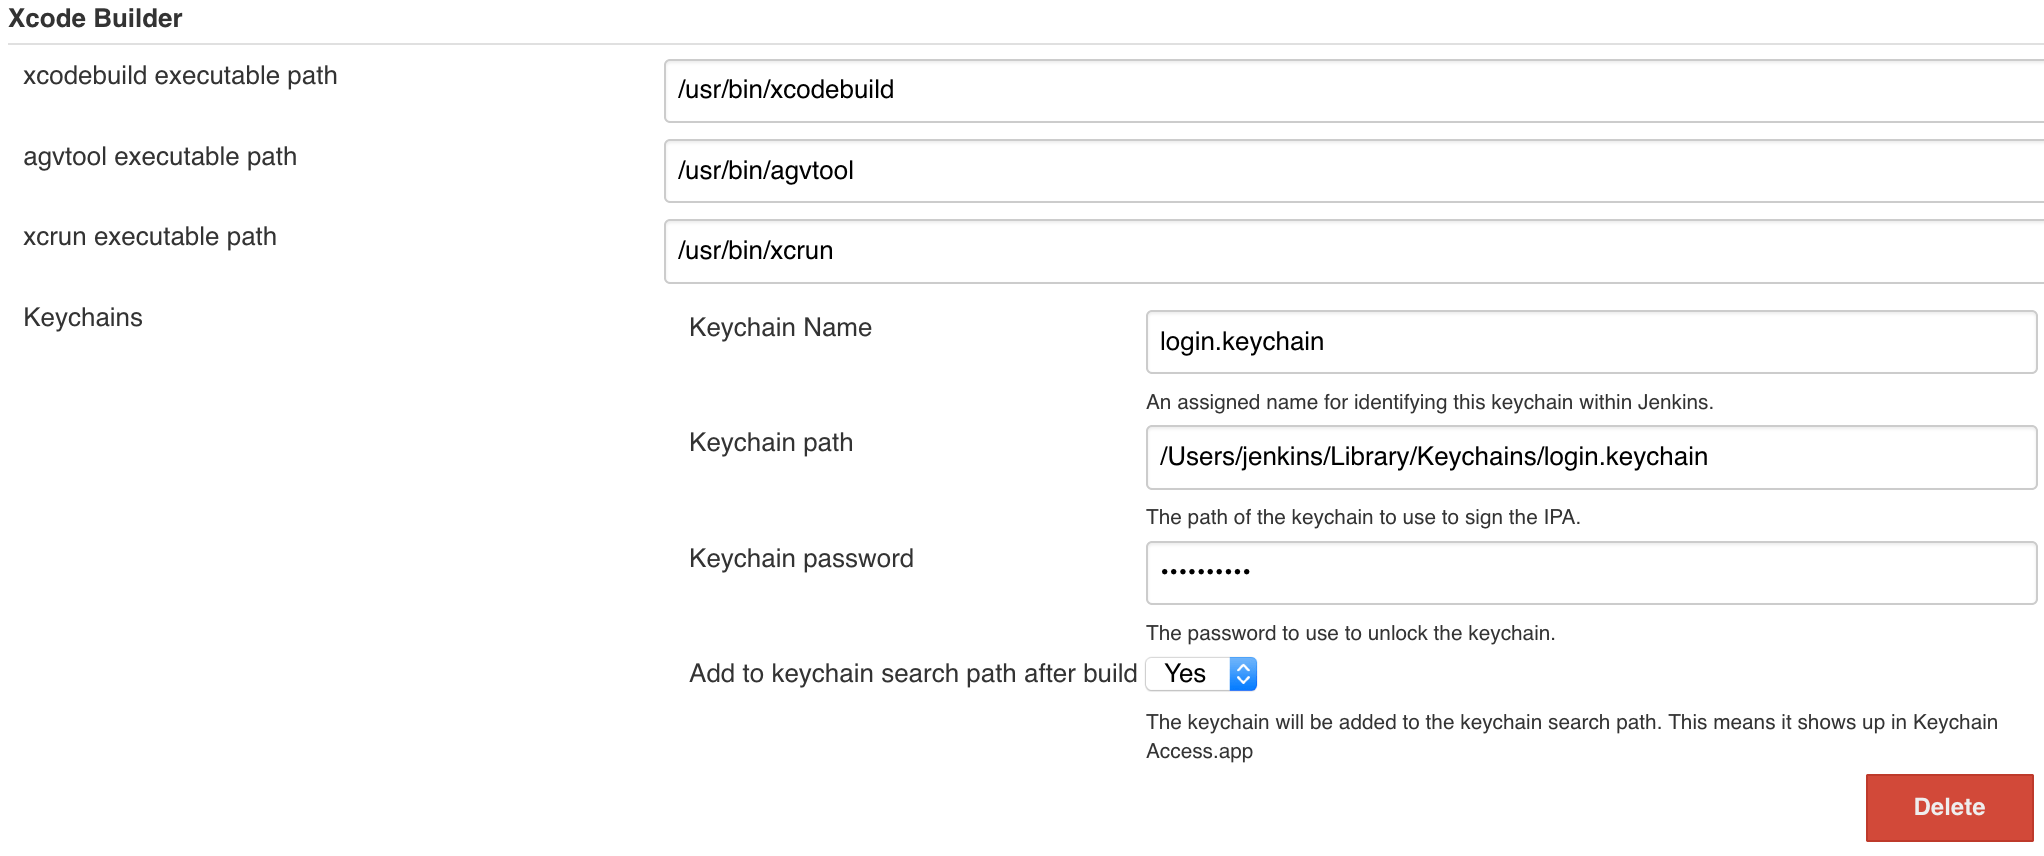
Now we can load the required certificates using GUI or shell into «login.keychain», while Xcode will pull its requirements during the build.
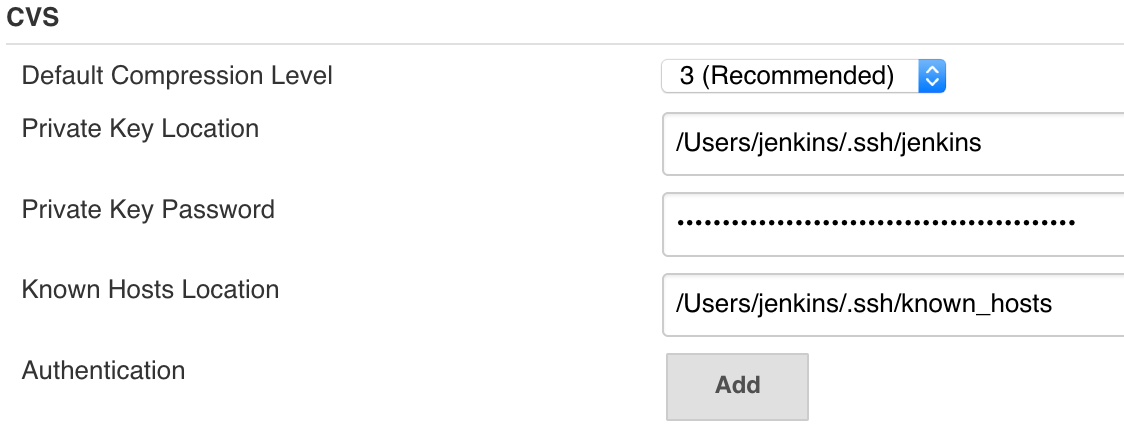
2. To configure access through ssh do the following:
###phere is a good example of how to do it);
b. Enter the key in the CVS section;
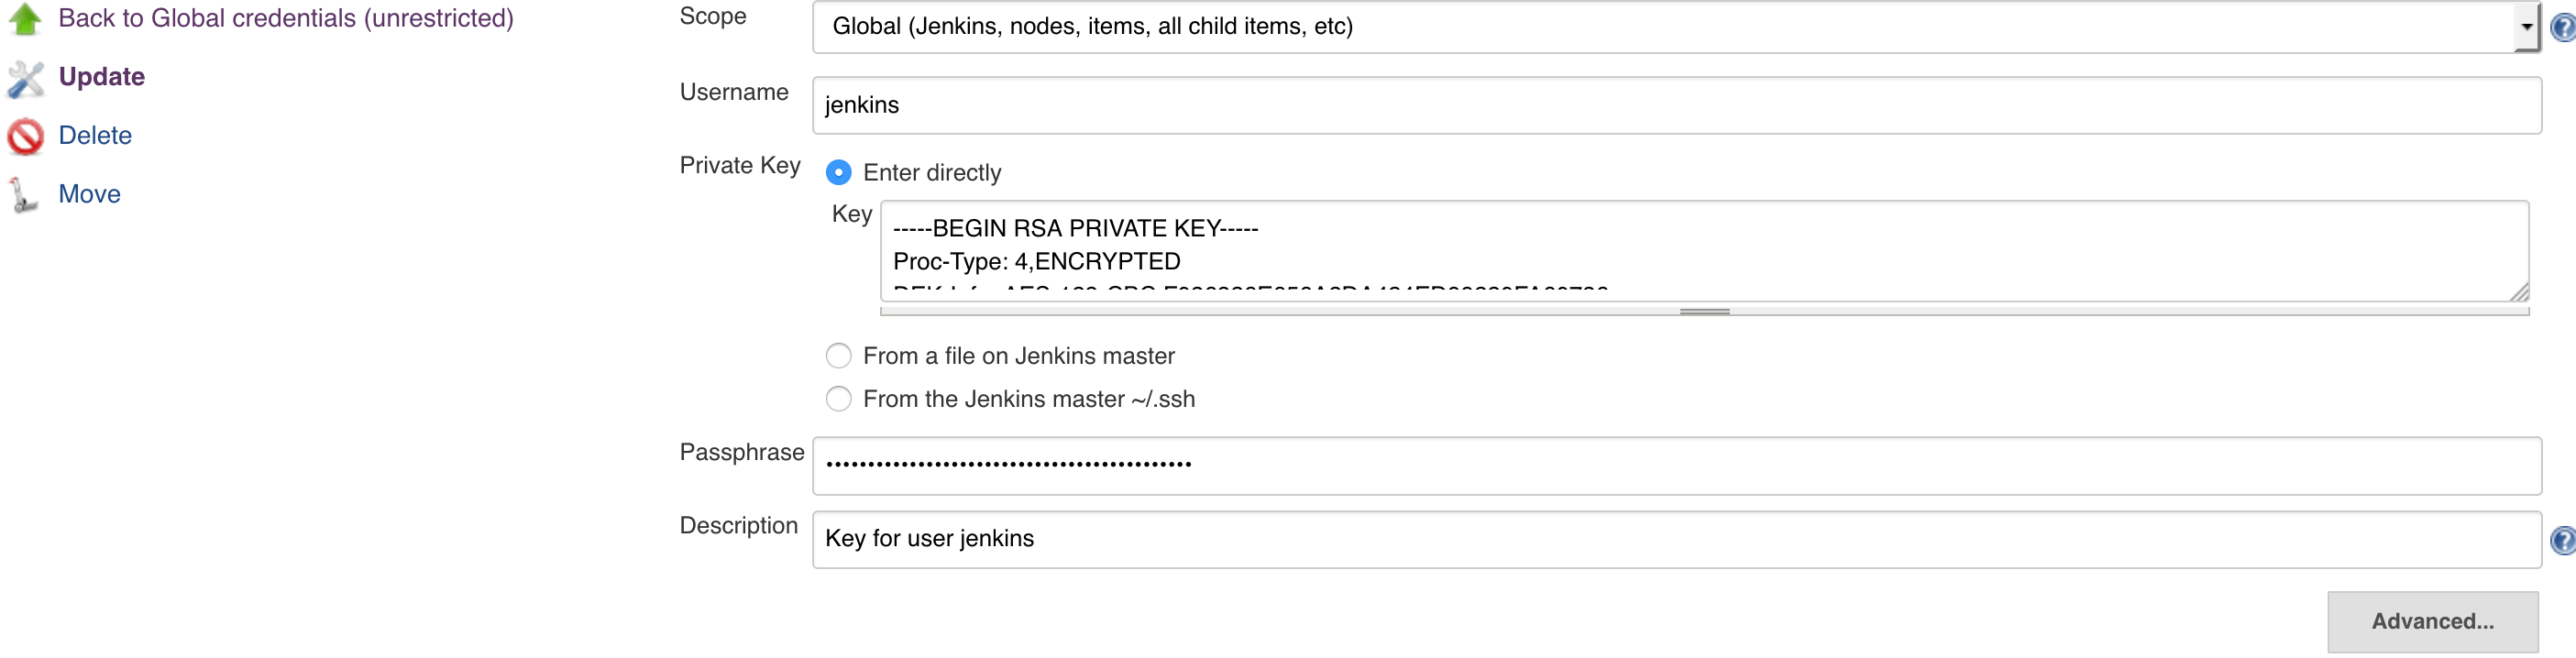
c. To access GitLab, navigate to the Credentials section on the main page of the Jenkins web interface. In this section you will have to add the private key for our user (in our case, Jenkins is the user registered in GitLab). You can either paste it as shown in the example below, or specify the path to it:
 d. You have to specify the according public key in the GitLab settings:

3. We will use the
Creating a job and configuring project build
1. Click «New Job» on the main page of the Jenkins web interface. Select the «Build a
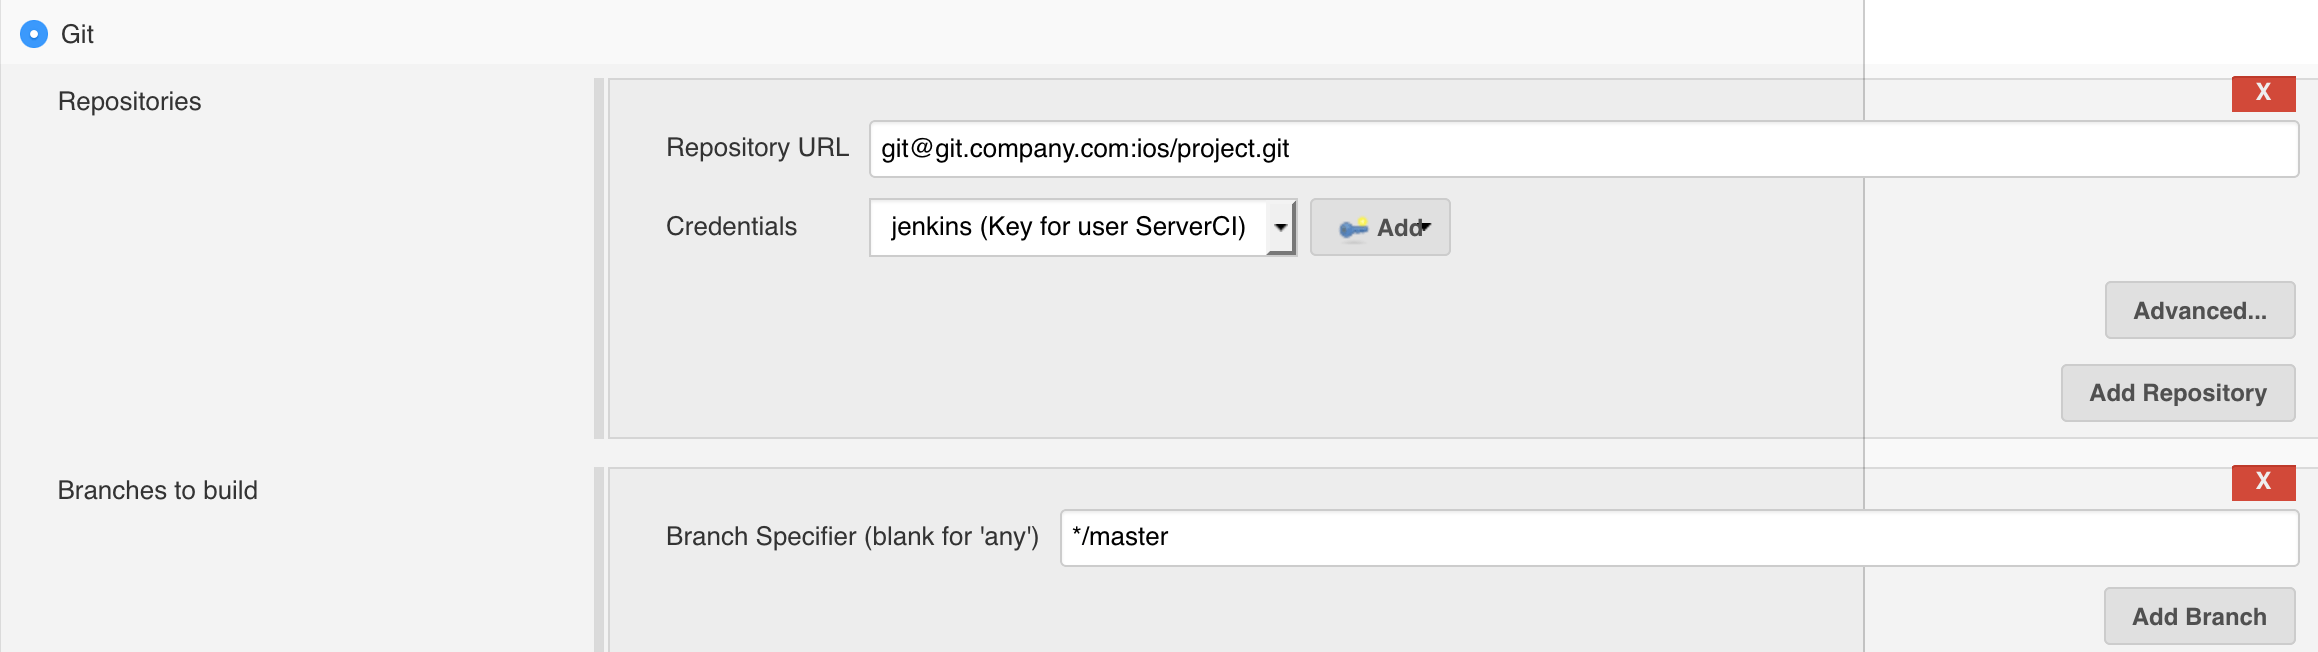
2. The first thing you have to do on the job settings page is navigate to the «Source code management " tab and configure project download from GitLab. While in this tab, enter the address of your project’s repository and specify the credentials that the server will use to obtain access to GitLab. Also, select what branch of the project is to be built:
3. Afterwards, navigate to the «Build» section. If you use the «CocoaPods» dependency manager and don’t add pod files into git, you will have to add the «Execute shell command» build step that’ll initiate pod installation:
#!/bin/bash -l
export LANG=UTF-8
pod install
Here you can wrap the installation with an
if [ $(( $(date +"%s") - $(stat -f %m Podfile) )) -le 60 ]; then
pod install
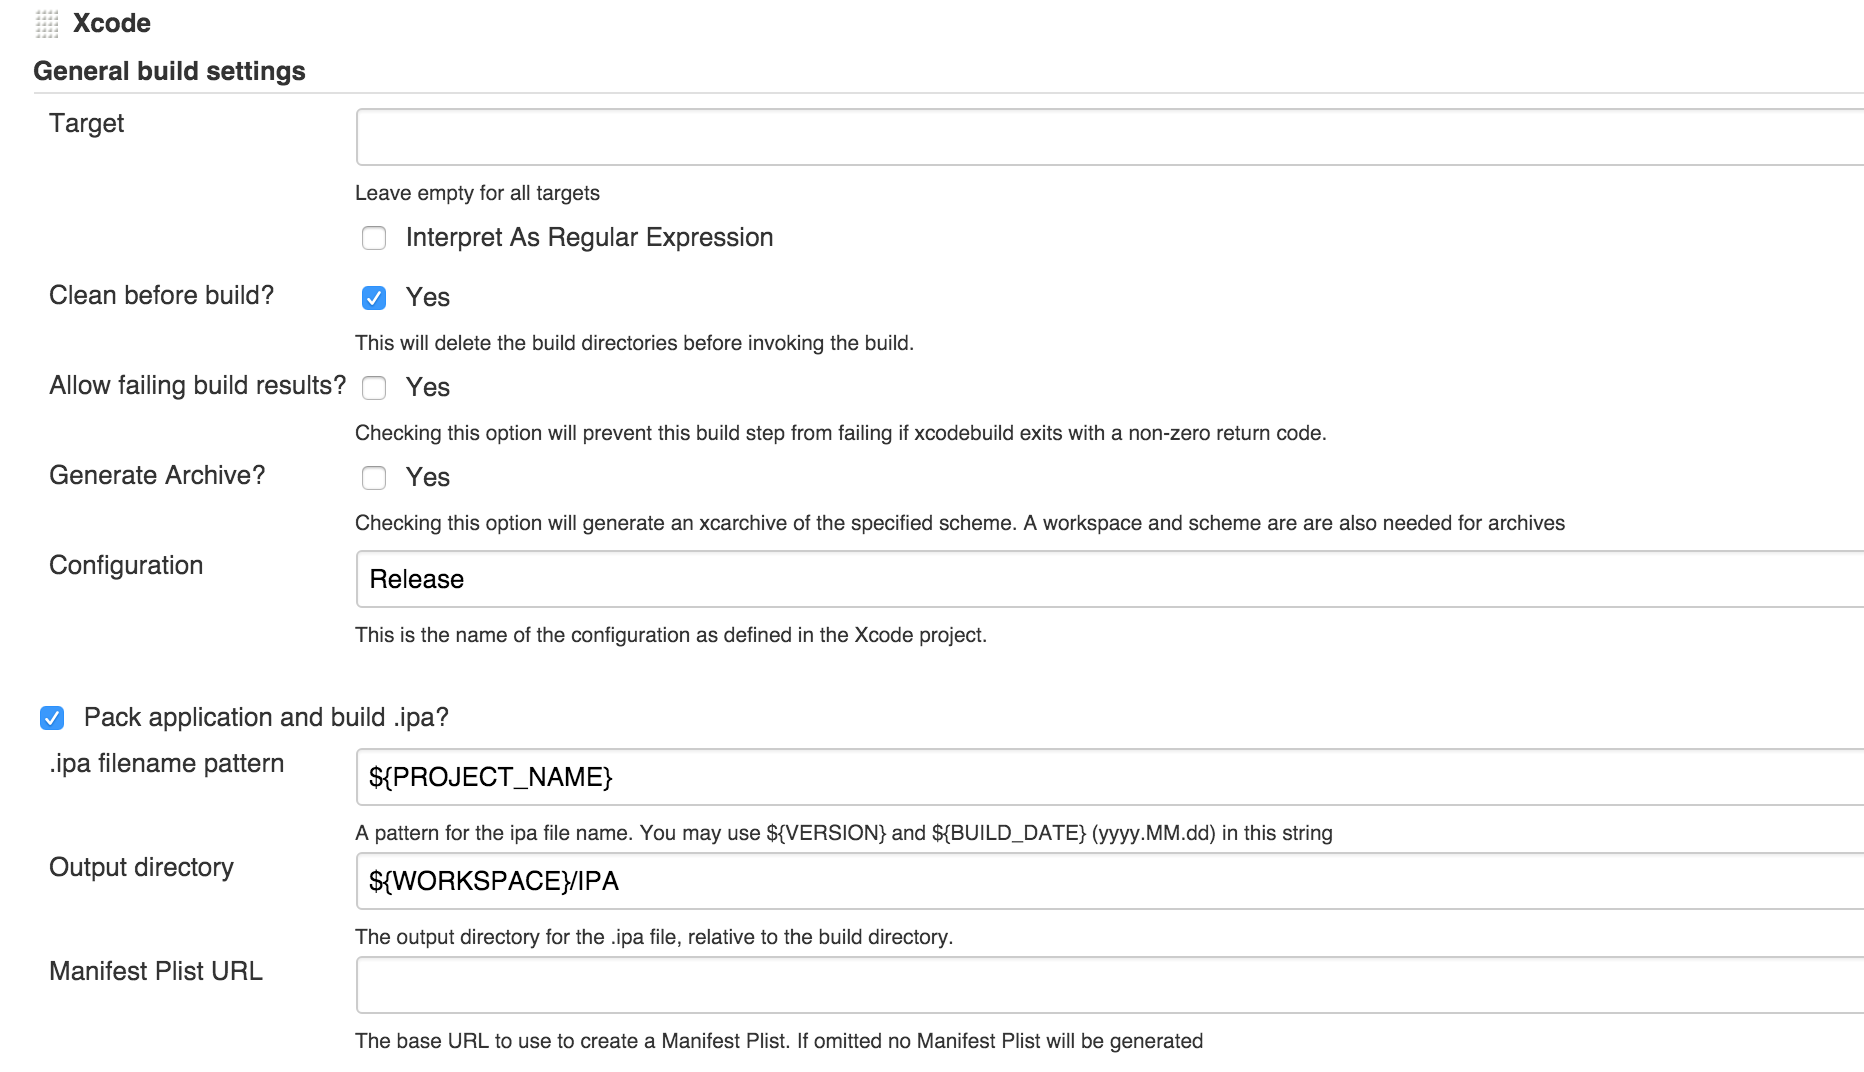
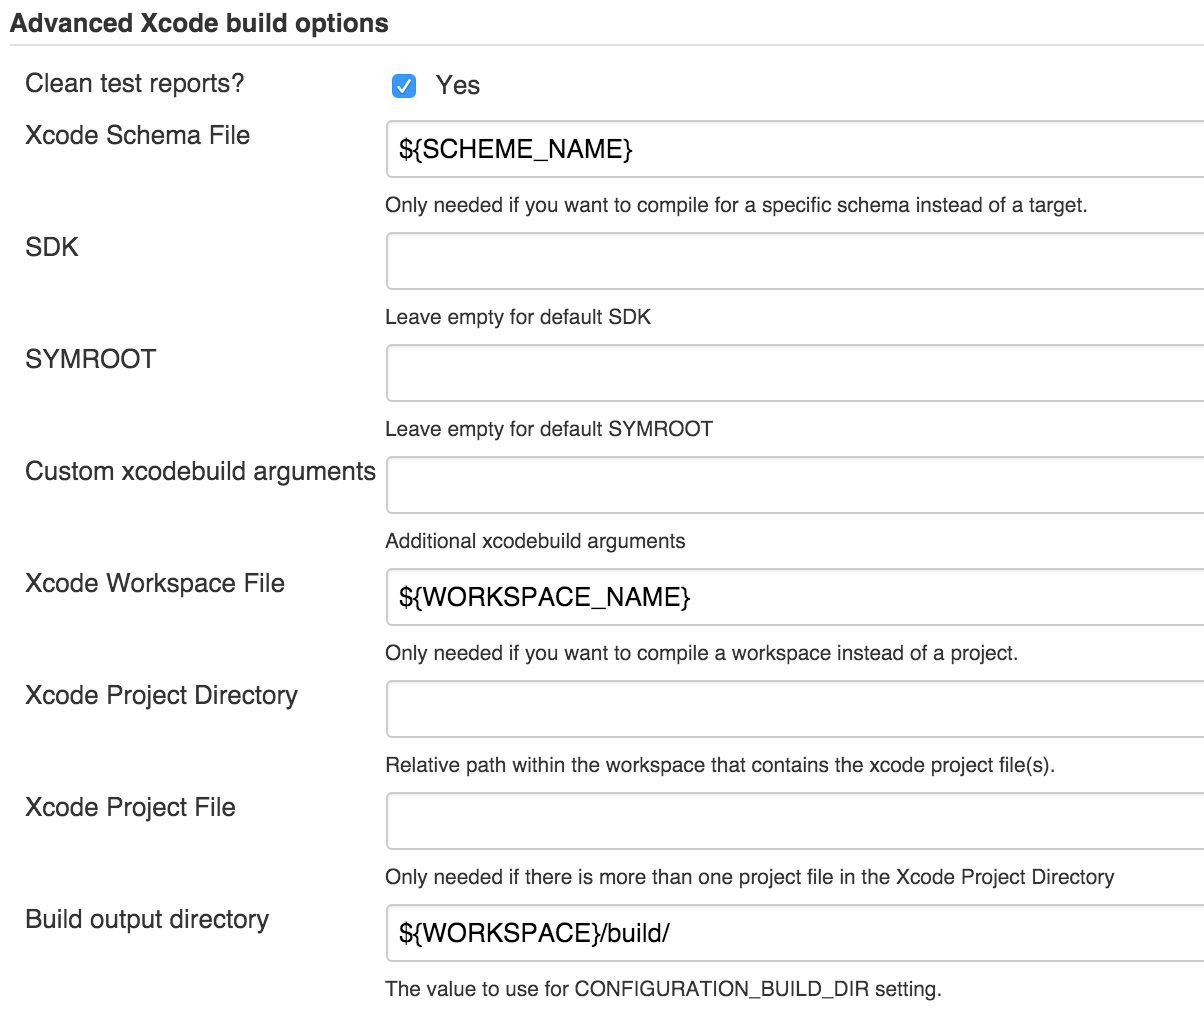
fi4. Add another build step: Xcode. If you use the CocoaPods dependency manager, you don’t need to enter a value in the Target field. Instead, specify the name of the scheme and.xcworkspace file in the Advanced Xcode build options. Here’s an example of a basic configuration:

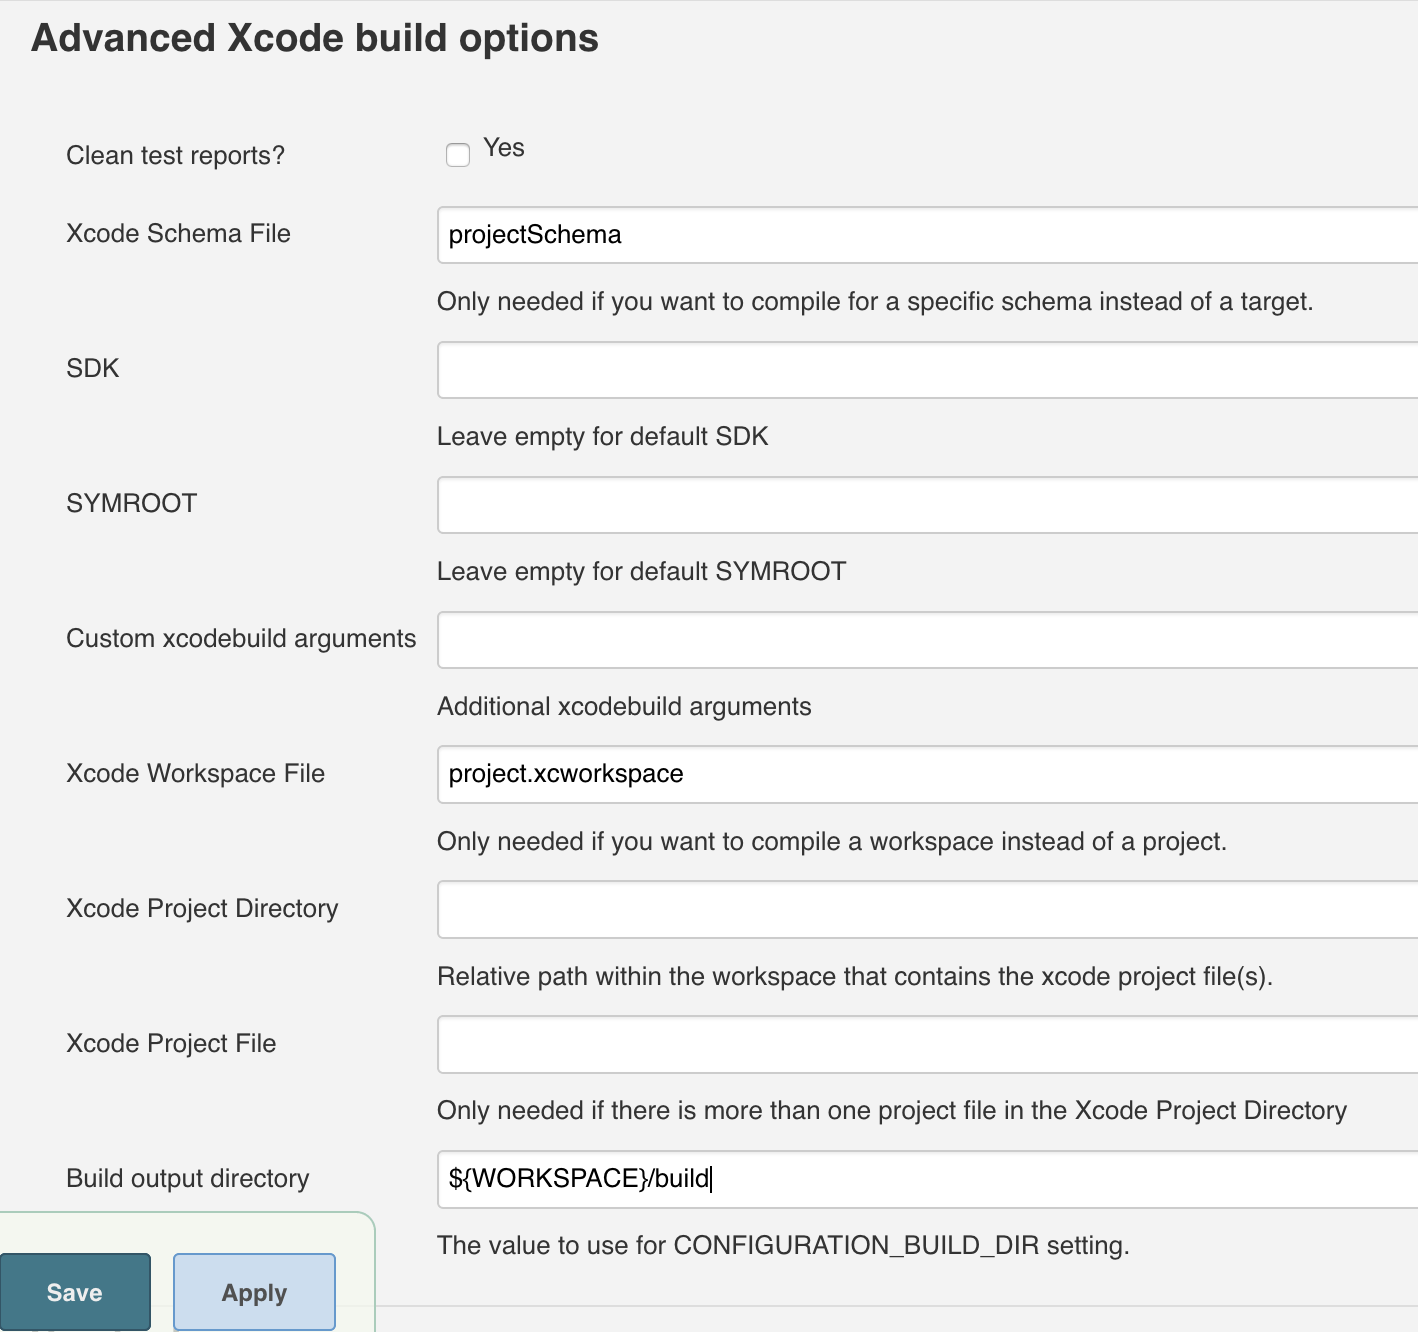
It’s worth noting that the executed scheme has to be flagged as shared in the settings of your project (Container can be set to either Workspace or Project):

Managing certificates and provisioning profile
Thanks to the Keychains and Provisioning Profiles Management plugin, installing the provisioning profile is made much easier.
To add the provisioning profile:
- Go to the Jenkins settings;
- Select the Keychains and Provisioning Profiles Management in the list;
- Click on the file selection button, find your provisioning profile and click Upload.
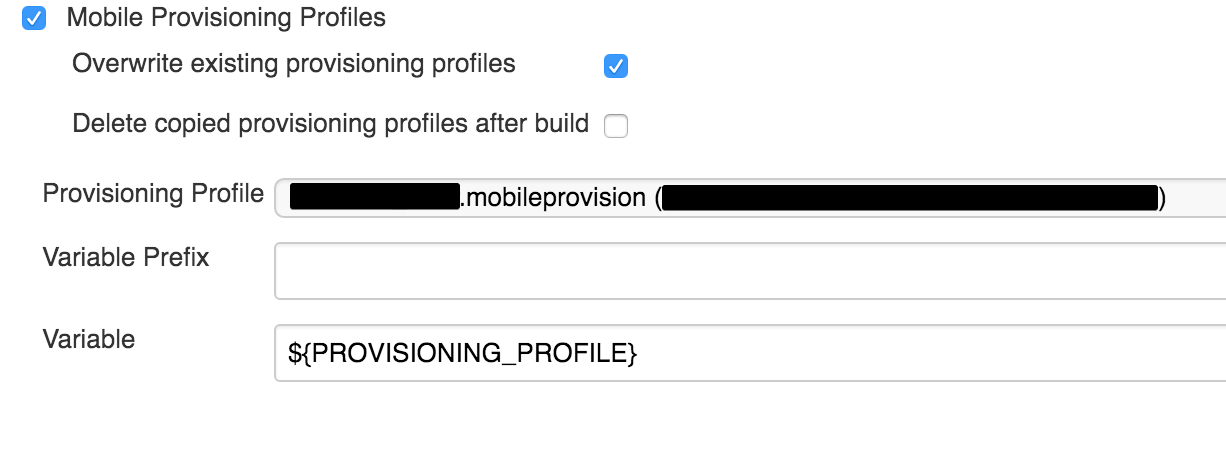
If you need to select a specific «Provisioning Profile», check the «Mobile Provisioning Profiles» flag in the «Build environment» section in the job settings and pick one of the loaded profiles:
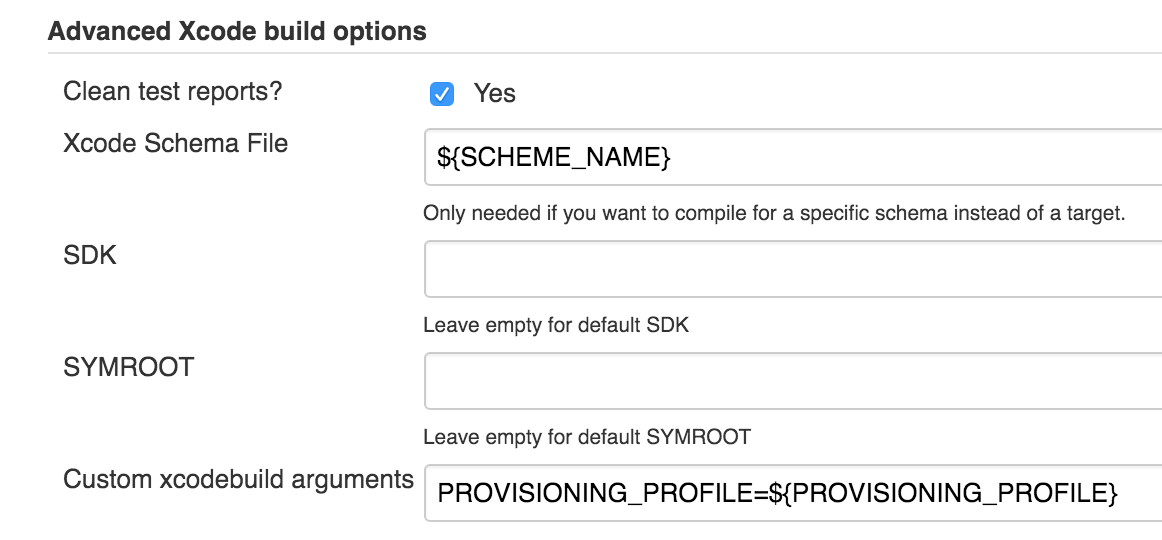
 Afterwards, you have to set up «custom xcodebuilt arguments» in the Xcode settings as shown on the screenshot:
You can use the GUI to load the certificate into the «login.keychain» (just click the certificate), but this option isn’t always available. Let’s take a look at the slightly more complicated option of adding via ssh:
- Download the required certificate for your Mac and install it in the local keychain access with a double click;
- Open up keychain access, find the required certificate and export the key in.p12 format;
- Send the certificate to the server:
scp certificate.crt jenkins@server:/Users/jenkins
- certificate — certificate name;
- jenkins — user name;
- server — server address;
- :/Users/jenkins — saved file path;
(You can use the parameter for specifying the required port in the following format: scp -P 20 certificate.crt jenkins@server:/Users/jenkins)
4. Send the key to the server:
scp privatekey.p12 jenkins@server:/Users/jenkins
5. Connect to the server using ssh:
ssh jenkins@server
6. Unlock access to the keychain:
security unlock-keychain -p password /Users/jenkins/Library/Keychains/login.keychain
7. Install the certificate:
security add-certificates ./certificate.crt
Copy the key:
security import privatekey.p12 -k /Users/jenkins/Library/Keychains/login.keychain -P password –A
You can learn more about the «security» command here.
More detailed information on how to add a specific certificate to a job can be found in the manual for the according plugin.
Before launch
Now we are ready to click the Build Now button on the main page of the Jenkins web interface or on the project’s page. Click on it and go to the Console Output section of the started build. Some useful information, including errors, will be displayed in the logs there.
If you’ve done everything right, at the end of the building process the log will read Finished: SUCCESS, and a blue success indicator will light up on the main Jenkins web page next to build name.
Installing the required programs and plugins
First of all, we have to install the programs that’ll collect statistics for us:
#Determines code test coverage
brew install gcovr
#Retrieves code line count
brew install cloc
#Alternative code line counter
brew install sloccount
#Searches for code duplication
brew install pmd
#Test result report generation (also generates data for oclint)
sudo gem install xcpretty
#Code static analysis
brew tap oclint/formulae
brew install oclint
Afterwards, we have to install the plugins for Jenkins that will display the retrieved statistics in an
- PMD
Plug-in — generates code statistic complexity reports; - SLOCCount
Plug-in — generates code line count reports; - Test Results Analyzer Plugin — generates test result reports;
- Cobertura Plugin — generates code test coverage reports;
- DRY
Plug-in — generates code duplication reports.
Install the utility plugins as well:
- Environment Injector Plugin — injects variables into the project;
- Pre SCM BuildStep Plugin — inject variables before the job starts;
- Build Authorization Token Root Plugin — job launching via
get-request with token; - Parameterized Trigger plugin — allows to launch jobs with parameters when building is finished;
- Slack Notification Plugin — sends messages to the Slack team chat;
- Publish Over SSH — this plugin is mentioned as an example. You might need it if you send data to the server through SFTP (as is true in our case).
Slack chat integration
To receive build status notifications in the Slack team chat, we have to configure integration with Jenkins in Slack’s settings. This can be done here.
After integration is complete, a unique token will be generated. This token has to be entered in Jenkins’ settings (or in the settings of a specific job), as per the following example:

Then we configure build launch using Slack’s
When setting up integration, you have to specify the name of your command, pick POST data transfer method and fill in the URL address to request.
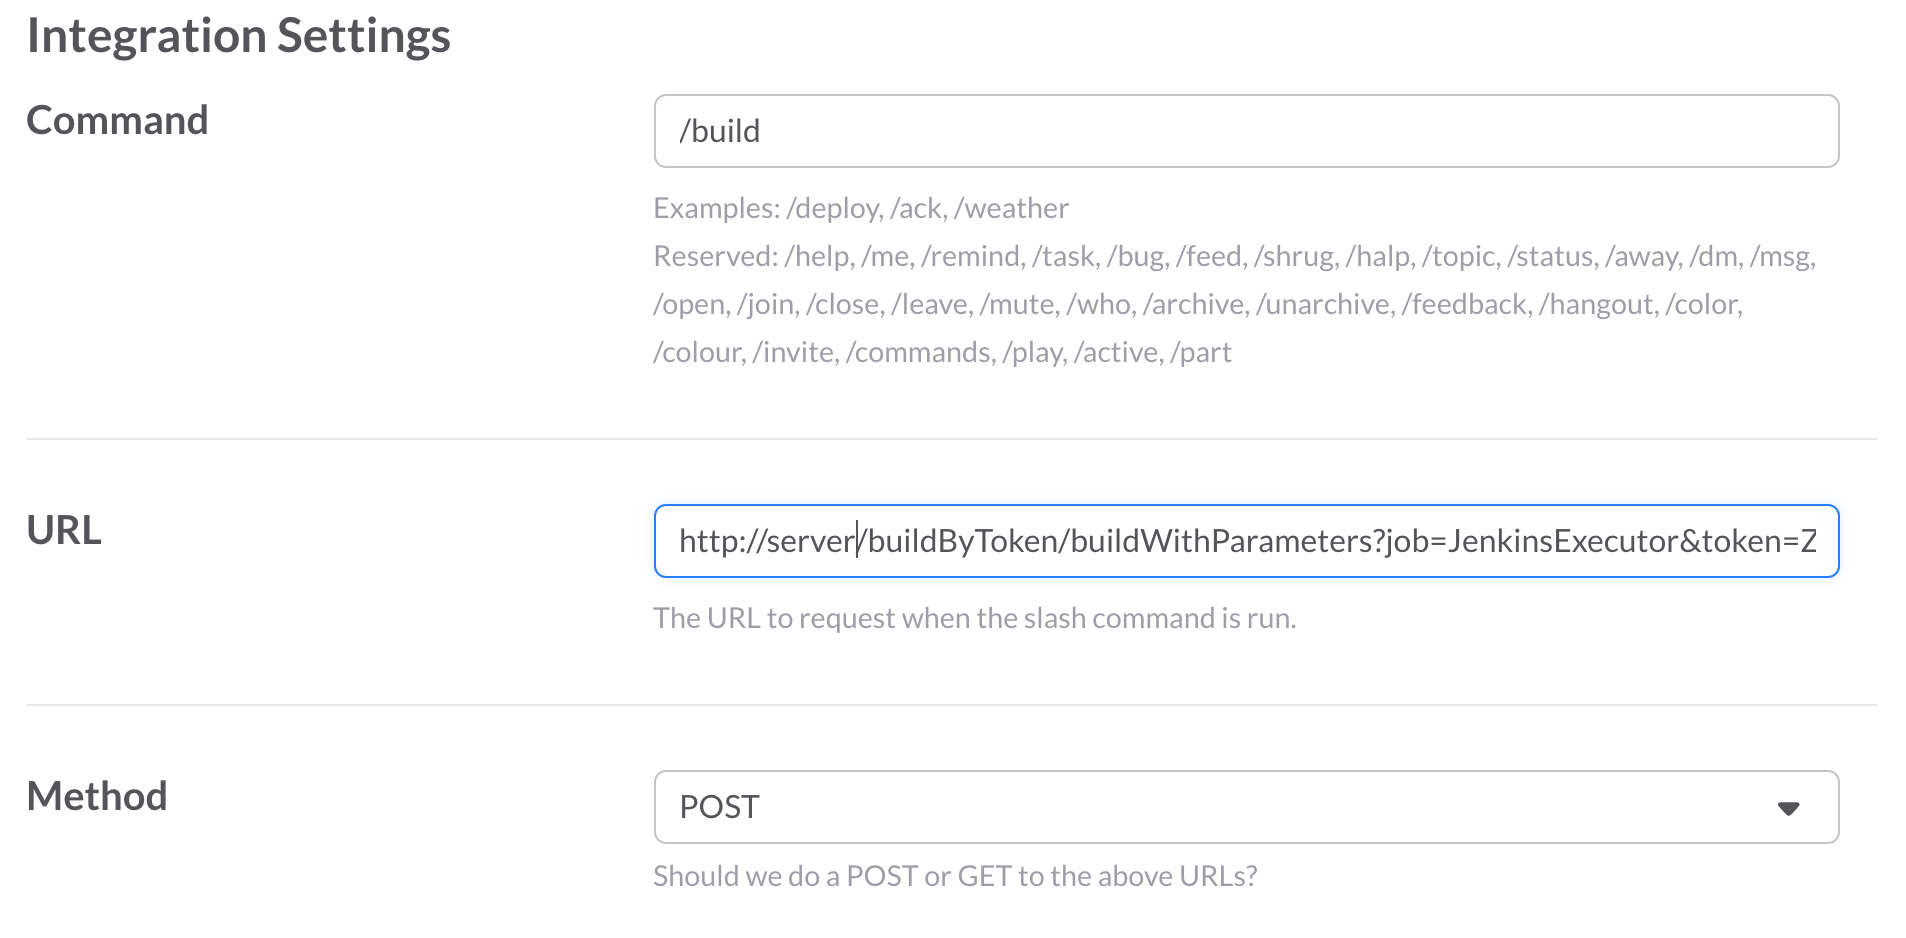
Let’s have a further look at the example that shows how the URL to request is generated. For instance, our URL looked like this:
http://server:8080/buildByToken/buildWithParameters?job=JenkinsExecutor&token=XXXXXXXXXXXXXXXXX
Our URL is made out of the following items
- server — the external address of your server. If necessary, specify the required port (in our case it’s 8080);
- buildByToken — this is a feature provided by the Build Authorization Token Root Plugin. It allows to launch the job from a link with the token specified (in our case it’s XXXXXXXXXXXXXXXXX);
- buildWithParameters — indicates that a parameterized build will be launched;
- JenkinsExecutor — the name of the job we’ll create and use to launch other jobs. More on this utility job later;
- XXXXXXXXXXXXXXXXX — token value that is specified in the plugin settings in each separate job’s configuration.
We will use the following command structure as an example:
/build Example test master
- /build — the name of our command;
- example — the name of the job;
- test — auxiliary flag that deals with launching tests and creating metrics reports;
- master — build branch.
This configuration will allow us to start building any project when we specify the required branch, while using a single command: /build.
Utility job configuration — JenkinsExecutor
We will need the utility job to launch other jobs. It can also be used to handle errors, such as the user entering a
Log into the server, create a new
Afterwards, check the «Trigger builds remotely» flag. Here you will have to specify the token, identical to the one we configured in the command settings in Slack.

Now we have to retrieve the values from the «text» variable. Navigate to the «Build» section and add an «Execute shell command» build step. Here is an example of the command:
#Creates an array from all the line items, separated with spaces
IFS=' ' read -a array <<< "$text"
#As per our example, the first value is the project name
JOB_NAME=${array[0]}
#The flag that deals with tests
TEST=${array[1]}
#Project branch name BRANCH=${array[2]}
#If necessary, other values can be retrieved
USER_NAME=${user_name}
CHANNEL_NAME=${channel_name}
To launch the build with parameters, send a POST-request to execute a specific job. To do this, add the following line to the shell command above:
curl -d TEST=${TEST} -d BRANCH=${BRANCH} -X POST \
-u username:password http://<nobr>127.0.0.1</nobr>:8080/job/${JOB_NAME}/buildWithParameters
«Password» here is the API key of the «username» user (the user must have permission to launch jobs).
To get the key:
- Click on username in the top right corner of the Jenkins web interface;
- Click on «Configure» in the left part of the screen;
- Click on Show API Key — now we’ve got the key.
Take note that all the launched builds have to be parameterized!
Build configuration
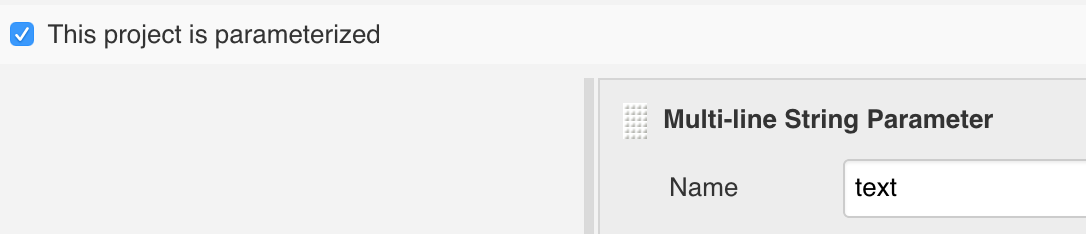
1. First of all, make sure when configuring the job that the build is parameterized. Check the according flag, add BRANCH and TEST parameters and set them default values:

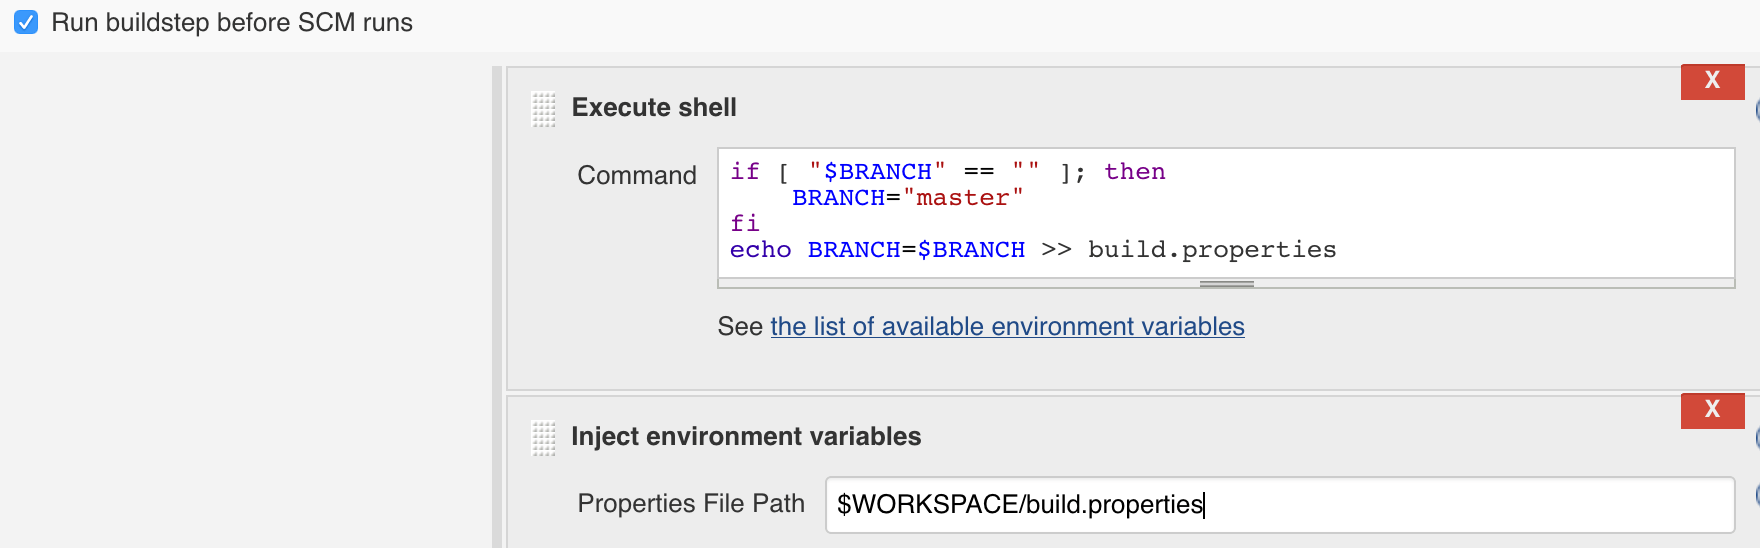
Take note that it is necessary to add a default value for the BRANCH variable, because if you launch the build from Slack without specifying the branch, the BRANCH variable will contain an empty value and return an error. To fix this, add the «Run buildstep before SCM runs» flag in the «Build environment» section. Then, add the «Execute shell command» build step and the «Inject environment variables» step. Follow this example:
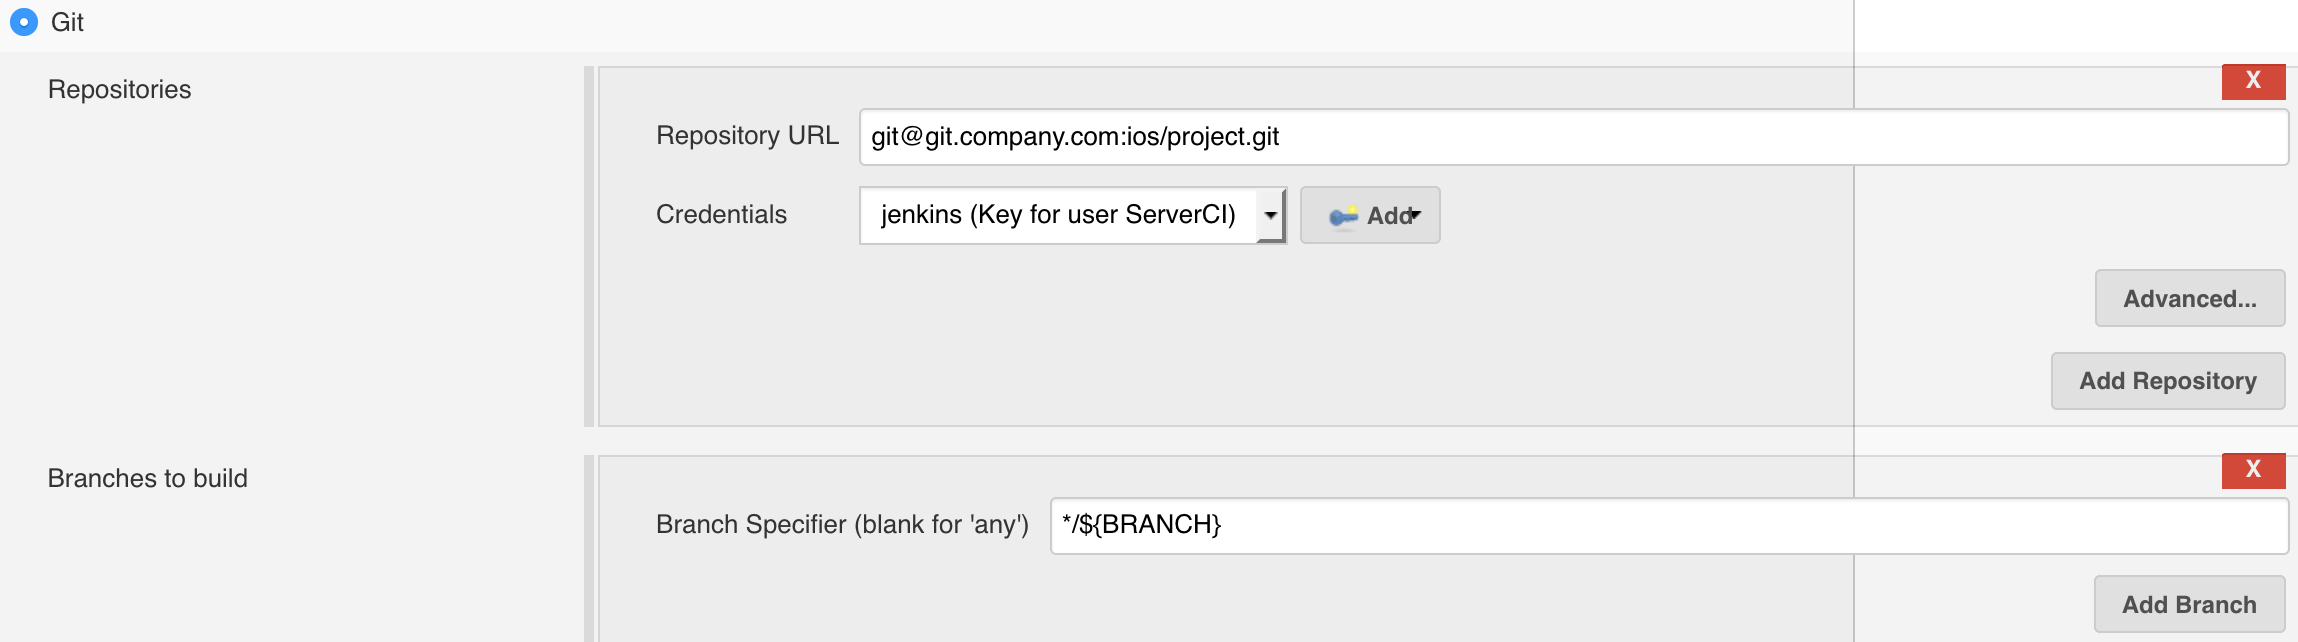
 2. Setting up GitLab interaction.
Enter the project’s repository address and specify the build branch (in our case it’s the BRANCH variable).
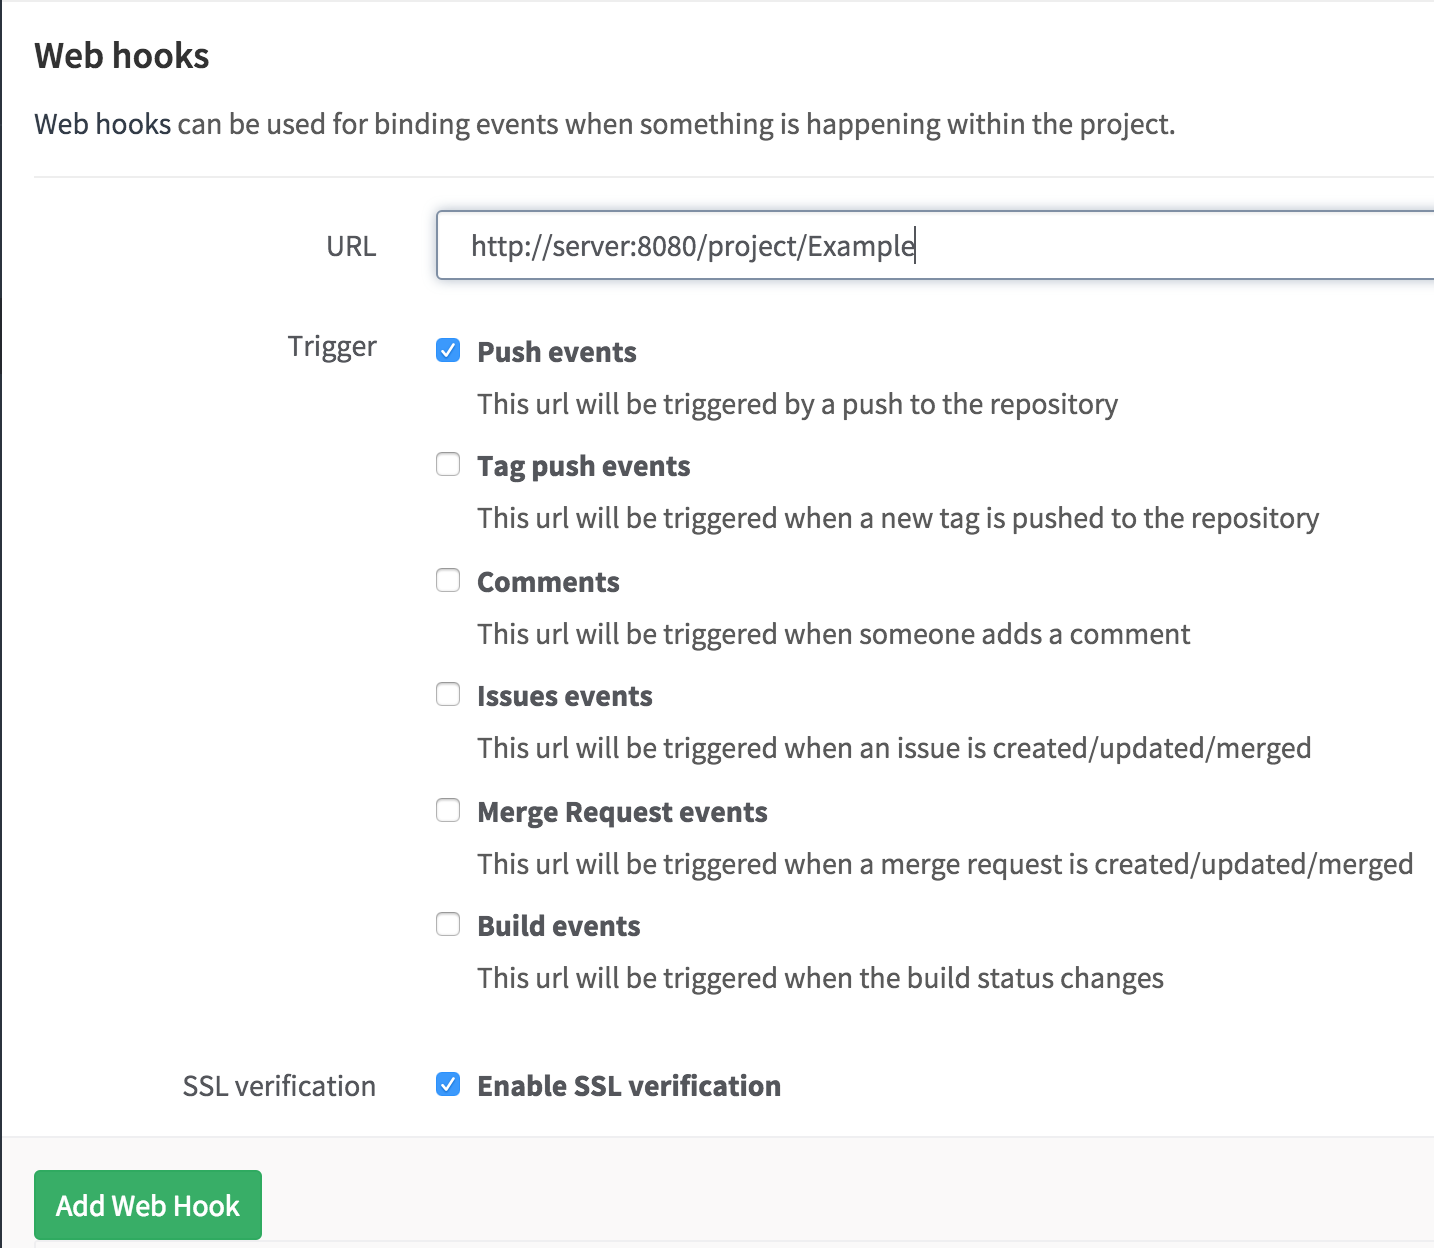
3. Setting up build by web hook.
Check the «Build when a change is pushed to GitLab» flag in the build triggers tab. Enter the required parameters and specify the branch for which the trigger will activate:
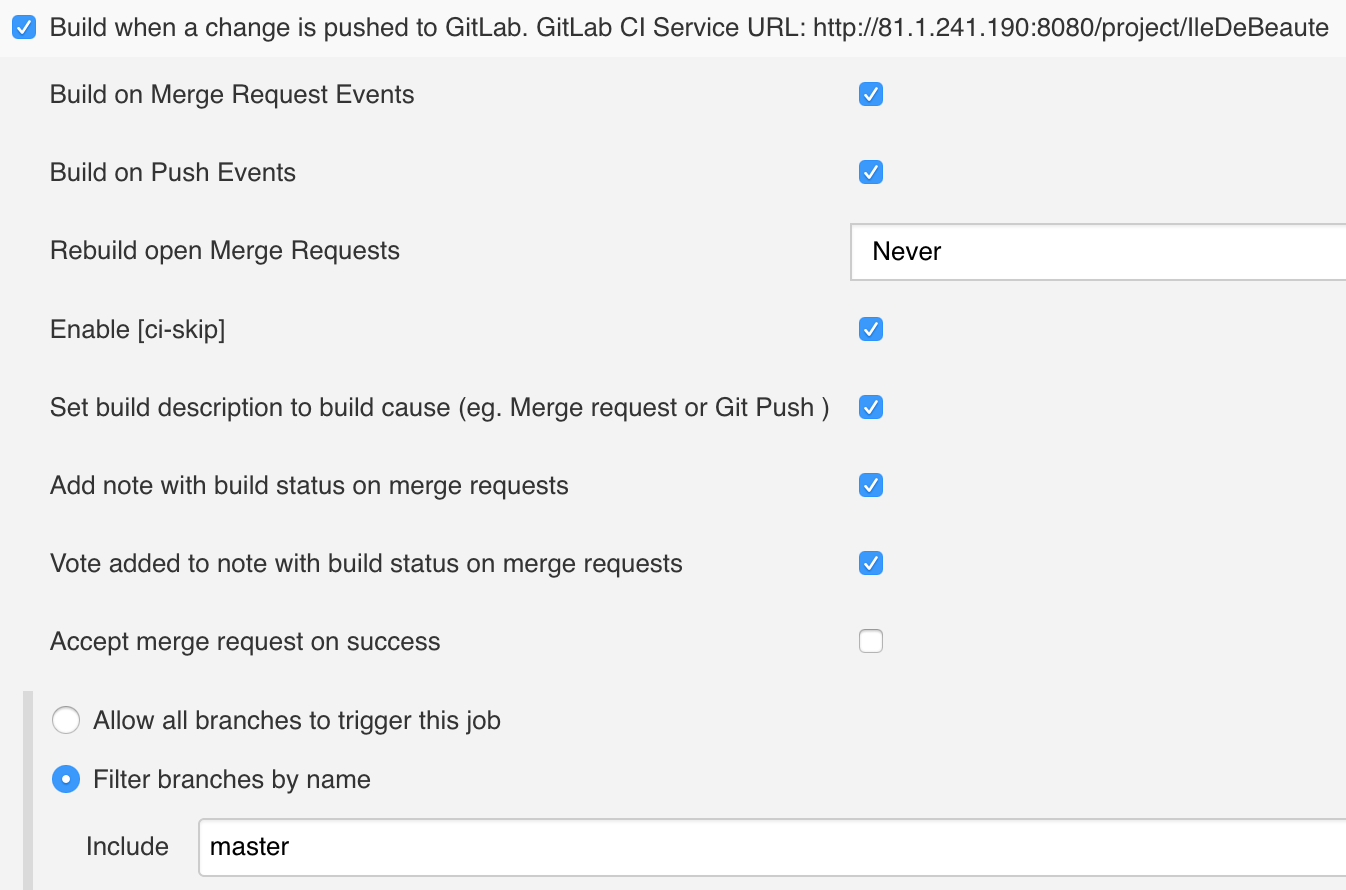
After this, add the web hook for the Jenkins server in the «Web hooks» category in the project settings on GitLab:
4. The building stage starts when the shell command is executed. The shell command installs pods if the file has been updated:
if [ $(( $(date +"%s") - $(stat -f %m Podfile) )) -le 60 ]; then
    pod install
fi
if [ $(( $(date +"%s") - $(stat -f %m Podfile) )) -le 60 ]; then
    pod install
fi
For convenience, add several variables for the project and write them in a file:
#.ipa file name
PROJECT_NAME="Example"
#.xcworkspace file name
WORKSPACE_NAME="Example"
#Executed scheme name
SCHEME_NAME="Example"
#Source code folder name that will be used for code line count
FOLDER_NAME_WITH_CODE="Example"
#Writing down variables in a file for use in other build stages
echo PROJECT_NAME=$PROJECT_NAME > build.properties
echo WORKSPACE_NAME=$WORKSPACE_NAME >> build.properties
echo SCHEME_NAME=$SCHEME_NAME >> build.properties
Depending on the TEST parameter, we launch or skip the testing and report generation stage. For example:
if [ "$TEST" == "test" ]; then
                 #Creating a folder to store the reports
if [ ! -d "reports" ]; then
               mkdir "reports"
        fi
      #Testing and creating reports for analysis
      xcodebuild -workspace ${WORKSPACE_NAME}.xcworkspace \
               -scheme ${SCHEME_NAME} \
               -configuration Debug \
               -sdk iphonesimulator \
               -destination 'platform=iOS Simulator,name=iPhone 6' \
        -IDECustomDerivedDataLocation="build_ccov" \
               GCC_GENERATE_TEST_COVERAGE_FILES=YES \
               GCC_INSTRUMENT_PROGRAM_FLOW_ARCS=YES \
               clean test | xcpretty -r junit -o reports/junit.xml -r json-compilation-database -o compile_commands.json
      #Publish JUNIT test = **/reports/junit.xml
      #Code syntactic complexity analysis
      oclint-json-compilation-database -v -e Pods -- \
        -rc=LONG_LINE=200 \
        -rc=NCSS_METHOD=60 \
        -rc=LONG_METHOD=100 \
        -rc=MINIMUM_CASES_IN_SWITCH=1 \
        -report-type pmd \
        -o reports/oclint.xml \
        -max-priority-1 1000 \
        -max-priority-2 1000 \
        -max-priority-3 1000
      #Publish PMD analysis = **/reports/oclint.xml

      #Code test coverage analysis
      gcovr --object-directory="build_ccov/${SCHEME_NAME}/Build/Intermediates/${SCHEME_NAME}.build/"\ "Debug-iphonesimulator/${SCHEME_NAME}.build/Objects-normal/x86_64/" \
      --xml \
      --print-summary \
      --exclude '.*Tests.*' \
      --exclude '.*Libs.*' \
      --exclude '.*ExternalFrameworks.*' \
      --exclude '.*Platforms.*' \
      --output=reports/coverage.xml
      #Publish Cobertura Coverage = **/reports/coverage.xml
      #Code line count (two options):
      cloc ${WORKSPACE}/${FOLDER_NAME_WITH_CODE} -by-file -skip-uniqueness -xml -out=${WORKSPACE}/reports/cloc.xml
#Publish SLOCCount analysis = **/reports/cloc.xml
    sloccount --duplicates --wide --details ${WORKSPACE}/${FOLDER_NAME_WITH_CODE} -v > reports/sloccount.sc
        #Publish SLOCCount analysis = **/reports/sloccount.sc
      #Code duplication analysis
      pmd cpd --files ${WORKSPACE}/${FOLDER_NAME_WITH_CODE} \
      --minimum-tokens 10 --language objectivec \
      --encoding UTF-8 \
      --format net.sourceforge.pmd.cpd.XMLRenderer | iconv -f macRoman -t utf-8 | sed 's/MacRoman/UTF-8/g' > reports/duplicated-code.xml
      #Publish duplicate code = **/reports/duplicated-code.xml
else
              touch reports/junit.xml
      #This line is required to prevent build failure because of report generation by the Publish JUNIT test result report
fi
For detailed information on command syntax, refer to the following manual pages:
5.

6. The next stage is build creation and.ipa archiving, for which we will use the XCode plugin. Follow the example:
7. The last step is to include
We’ve generated the files for five reports, and now he have to refer these files to their according plugins.
- Publish PMD analysis results = **/reports/oclint.xml
- Publish Cobertura Coverage analysis results = **/reports/coverage.xml
- Publish SLOCCount analysis results = depending on the module we’ve used:
- **/reports/sloccount.sc
- **/reports/cloc.xml
- Publish JUNIT test result report = **/reports/junit.xml (Notice: «Do not fail the build on empty test results» flag has to be checked in the advanced settings of the plugin. This will help to prevent Fail status of the build if it was executed without launching tests)
At this stage, we can send the.ipa file wherever we need to (to the server, by
The last step is to set up Slack Notification, which, as you might figure, sends notifications into Slack chat. You can enter individual settings for the current job in the advanced settings of the plugin. Notice that the message can be a variable (e.g.: $MESSAGE), the value of which can change on different build stages. This can make the messages you send to Slack more conclusive.
At this point, CI integration can be considered complete.