


Stripe is just that good and we want this article to explore the basic issues of integrating this service with an
However, before you use Stripe,
You should also keep in mind that Stripe doesn’t support the
Carrying out a payment
To transfer the money from the customer’s card to our Stripe account we will have to do the following steps. Using the Stripe.js script we’ll get the Stripe token on the frontend, and then we’ll use the token on the server side to carry out the payment.
Add Stripe.js and set the public key:
<script type="text/javascript" src="https://js.stripe.com/v2/"></script>
<script type="text/javascript">
 Stripe.setPublishableKey('your_public_key');
</script>
Make a regular HTML form and specify
<form action=«" method=»POST» id=
<span class=
<label>Card Number</label>
<input type=«text» size=«20»
<label>Expiration (MM/YY)</label>
<input type=«text» size=«2»
<input type=«text» size=«2»
<label>CVC</label>
<input type=«text» size=«4»
<input type=«submit» class=«submit» value=«Submit»>
</form>
Now let’s get the token:
$(function() {
 var $form = $('#payment-form');  $form.submit(function(event) {
      // Turn off the button to prevent unwanted clicks
   $form.find('.submit').prop('disabled', true);
       // Request token from Stripe
   Stripe.card.createToken($form, stripeResponseHandler);
    // Disable submit for the form
   return false;
 });
});
  function stripeResponseHandler(status, response) {
 // Grab the form:
 var $form = $('#payment-form');
  if (response.error) { // Problem!
    // Display errors in the form:
   $form.find('.payment-errors').text(response.error.message);
   $form.find('.submit').prop('disabled', false); // Re-enable submission
  } else { //
 // Token was created
    // Get token id:
   var token = response.id;
    // Insert token in the form so that it gets to the server after we submit it:
   $form.append($('<input type="hidden" name="stripeToken">').val(token));
    // Submit the form:
   $form.get(0).submit();
 }
};
Just in case, this step is described in the official manual.
Now we can debit the customer using the server. Here are some PHP code examples:
// Setting a secret key
\Stripe\Stripe::setApiKey("your_secret_key");
 // Getting the token from the form
$token = $_POST['stripeToken'];
 // Creating the charge
try {
 $charge = \Stripe\Charge::create(array(
   "amount" => 1000, // sum in cents
   "currency" => "usd",
   "source" => $token,
   "description" => "Example charge"
   ));
} catch(\Stripe\Error\Card $e) {
 // Payment didn’t come through
}
This is all you have to do to transfer the money from the customer’s card to your Stripe account.
Automatic money transfers to your vendors
Let’s examine an actual example of a transfer. Imagine you are making a platform that sells rare books from small publishing houses worldwide. You need to transfer money to your vendors (publishers) so that they send the book to the client, and you charge a 10 $ fee for each sale. You don’t want to be bothered with monthly reports and payments; you just want to transfer the money every time the customer pays. Stripe can do it.
As in the previous case, the vendor has to be located in one of the countries supported by Stripe to set up automatic transfers.
Stripe has a remarkable feature called Managed Acсounts, which we can use to (sort of) create a Stripe account for our vendor which we’ll manage ourselves so that the publishing house won’t have to register in Stripe.
First of all, we have to get the bank account info of the publishing house using the aforementioned Stripe.js script. Like in the case of debiting the customer’s card, to work with the bank account we require the Stripe token.
Stripe.bankAccount.createToken({
 country: $('.country').val(), // 2-character country code (US)
 currency: $('.currency').val(), // 3-character currency code (USD)
 routing_number: $('.routing-number').val(), // bank routing number
 account_number: $('.account-number').val(), // bank account number
 account_holder_name: $('.name').val(), // company owner’s name (name of the owner of the publishing house in our case)
 account_holder_type: $('.account_holder_type').val() // account type — individual enterpreneur or company (individual, company) // account type (individual, company)
}, stripeResponseHandler);
You can also find this in the manual.
As a side note, be aware that for each country the bank info (routing_number, account_number) is filled in differently. For example, you will require the IBAN number for European countries, which is put into the account_number field while the routing_number field isn’t sent at all. Also, for some countries internal account numbers are merged into a single line when put in the fields. For example, to obtain the correct routing number for a Canadian bank, you will have to merge the transit number and the institution number. If the transit number is 02345 and the institution number is 987, the resulting routing_number will be 02345987. The account number will vary depending on the bank. For Germany you will only require the IBAN number and it’s filled in the routing_number field, e.g., IBAN: DE89370400440532013000 (22 characters). To find out how to fill in these fields for other countries, refer here.
Now that we have the token for the bank account where we will send the money for our vendors, let’s create a Managed Account. Suppose our publishing house is located in the USA, it is a company (not an individual) and we pay it in USD.
\Stripe\Stripe::setApiKey("your_secret_key");
$account = Account::create([
  "country" => 'US',
  "managed" => true,
]);
if (isset($account->id)) {
  try {
      $account->external_accounts->create(
          ["external_account" => $token] // our bank account token
      );
  } catch (InvalidRequest $error) {
     // an error happened when creating the account
  }
}
It might seem that now that we have a Managed Account we can transfer the money, but we have to verify the account first. For this we have to provide Stripe with certain legal data concerning the business. You can check here to determine what data you need in which country.
For our publishing house in the USA we have to provide the following data:
| Name | Description |
|---|---|
| legal_entity.address.city | The city where the business is located |
| legal_entity.address.line1 | Business address |
| legal_entity.address.postal_code | Postal code |
| legal_entity.address.state | State |
| legal_entity.business_name | Business name |
| legal_entity.business_tax_id | Tax ID number |
| legal_entity.dob.day | Owner’s DOB (day) |
| legal_entity.dob.month | Owner’s DOB (month) |
| legal_entity.dob.year | Owner’s DOB (year) |
| legal_entity.first_name | Owner’s first name |
| legal_entity.last_name | Owner’s last name |
| legal_entity.ssn_last_4 | Four last numbers of the owner’s social security number |
| legal_entity.type | individual/company |
| tos_acceptance.date | Date of accepting the Stripe ToS (Terms of Service) |
| tos_acceptance.ip | span class=«caps»>IP address used to accept the Stripe ToS |
You can find the Stripe Terms of Service here. The person whose name is used when creating the Managed Account has to accept them.
Stripe might also request additional information. For the US:
| Name | Description |
|---|---|
| legal_entity.personal_id_number | Personal ID number |
| legal_entity.verification.document | Proof of identity document scan |
When you’ve gathered all the necessary info, it’s time to edit the account:
\Stripe\Stripe::setApiKey("your_secret_key");
$account = Account::retrieve($accountId);
$account->legal_entity->address->city = 'New-York';
$account->legal_entity->address->state = 'New-York';
$account->legal_entity->address->postal_code = '00501';
$account->legal_entity->address->line1 = 'Some address';
$account->legal_entity->business_name = 'US TEST;
$account->legal_entity->business_tax_id = '00000001';
$account->legal_entity->dob->day = 1;
$account->legal_entity->dob->month = 1;
$account->legal_entity->dob->year = 1980;
$account->legal_entity->first_name = 'Bob';
$account->legal_entity->last_name = 'Smith';
$account->legal_entity->type = 'company';
$account->legal_entity->ssn_last_4 = '0000';
$account->tos_acceptance->date = 1466074123;
// timestamp
$account->tos_acceptance->ip = <nobr>123.123.123.123</nobr>;
try {
$account->save();
} catch (InvalidRequest $error) {
// an error happened when saving
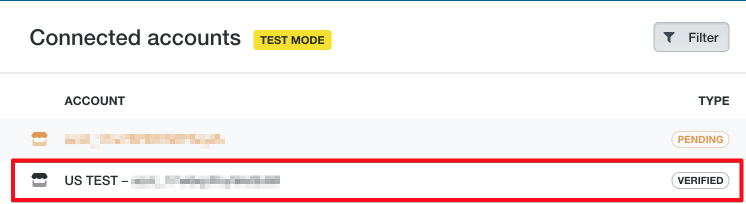
} The Stripe team will check the data and we will see the «Verified» status in the admin panel. https://dashboard.stripe.com/test/applications/users/overview
(you will have to click on images to get a full size view).
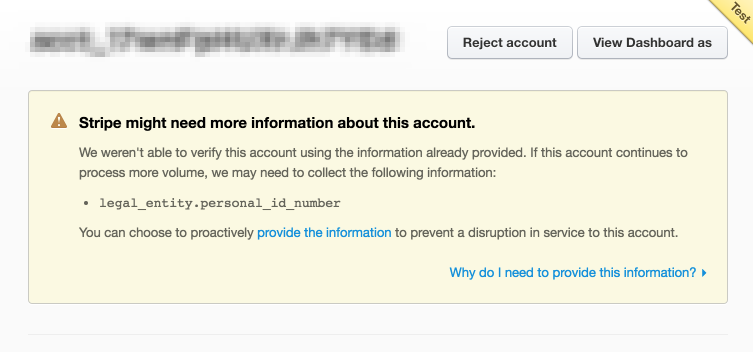
However, this is not enough. The Stripe team might point out mistakes in the data or request additional info (for example, personal_id_number).
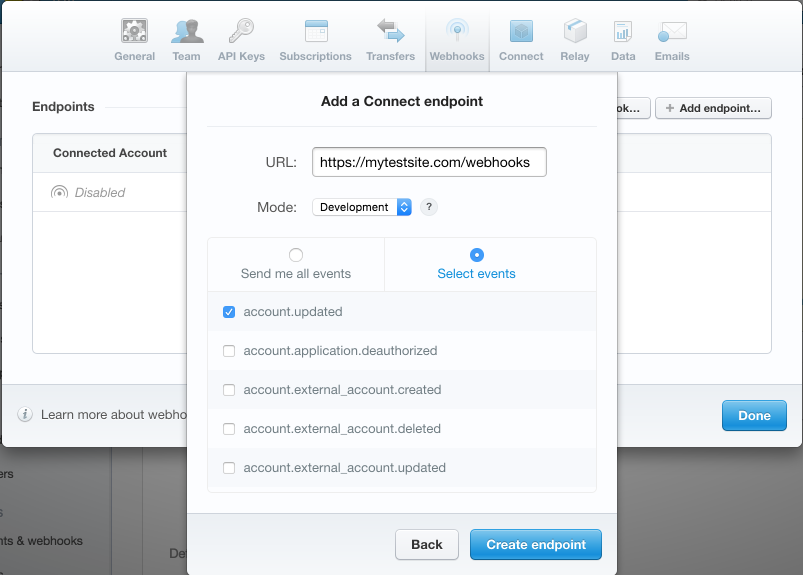
After the team have checked the data the account will be refreshed. You can set up a webhook for this event.
The necessary fields will be described in the account’s object:
$account->verification->fields_needed
Stripe can also set a deadline for providing the data. If there is a due date, it will be present in the property: $account->verification->due_by.
Stripe provides an excellent environment for verification testing. Using transfers from specific test cards we can simulate various scenarios of the account verification process. Here are some of the example scenarios:
- The data is not filled in and we can’t carry out payments at all;
- The payment limit has been reached. This happens when Stripe considers the transfer to be too large and the provided information is insufficient. In this case, it disables the Managed Account;
- Disabling the account with the request to fill in the data by a certain deadline;
- Uploading the scan of the document that proves the account owner’s identity.
- Acceptance and rejection of this scan.
You can find the details on how to simulate these cases here.
In any case, you will have to handle all of these situations, and, in my experience, it is best to provide Stripe with the maximum amount of info to prevent any surprise account deactivations.
When everything is OK and Stripe has verified your Managed Account, you will need to switch to API-based transfers or turn off the automatic ones (same thing). https://dashboard.stripe.com/account/transfers
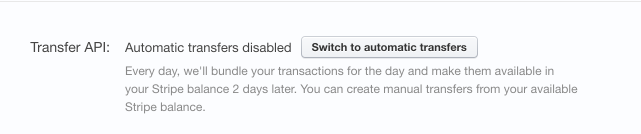
Now we have a verified account, the transfers are enabled and we can transfer money directly to the vendor.
Suppose we have a book that the vendor wants to sell for 50 $. We want 10 $ as a fee and we need to include Stripe’s fee for transfer in the price. Right now Stripe charges 2.9% + 30¢ for each transfer. We decide that we will pay this fee on our part; therefore, the user will have to pay 60 $ for the book while we pay a fee of 2.04 $ to Stripe.
We get the token using Stripe.js and carry out the payment from the server side:
$charge = Charge::create([
   "amount" => 6000, // in cents
   "currency" => 'USD',
   "source" => $token,
   "application_fee" => 1000,
    "destination" => $managedAccountId
]);
The application_fee property allows us to specify which portion of the transfer will be left on our account. The Stripe fee will always be deducted from our account only, even if we carry out a full transfer to the vendor.
The vendor’s bank account will not be credited immediately; the money is withdrawn once in seven days. This means that we transfer the money to our vendor’s Stripe account, and in seven days it is transferred to the attached bank account.
Additional features
As a bonus, Stripe allows you to save customers, add
Useful links
Countries supported by Stripe
Custom HTML form for getting a token
Managed Accounts
Getting the token for the bank account
Necessary banking info (by country)
Necessary legal info for Managed Accounts (by country)
Stripe Services Agreement
Testing account verification
Webhooks
Stripe Pricing
Stripe API Reference